Bedroom Climate Controller with Touch Interface
⏸️ AbandonedA compact climate controller with OLED display and capacitive touch buttons for monitoring weather, controlling heating, and displaying indoor conditions
Required Devices
Adafruit NeoPixel
Addressable RGB LED strips and modules with WS2812/WS2812B chips
lightBeetle ESP32-C6
DFRobot Beetle ESP32-C6 Development Board
board1.12" Mono SPI OLED Breakout
1.12" Mono OLED (128x128, white/black) Breakout - SPI by Pimoroni
displayTouch pHAT
Touch pHAT with 6 touch pads and 6 LEDs by Pimoroni
inputUsed Components (17)
Native API
api Communication protocol for connecting ESPHome to Home Assistant and other clients
Captive Portal
captive_portal Fallback WiFi configuration portal when device cannot connect
SSD1306 SPI Display
ssd1306_spi Display driver for SSD1306 and SH1106/SH1107 OLED displays over SPI
External Components
external_components Load custom or third-party ESPHome components
Global Variables
globals Store persistent values that can be accessed across automations
CAP1166
cap1166 Capacitive touch controller for 6-channel touch inputs with LED control
Font
font Load and use TrueType fonts for display text rendering
Image
image Display bitmap images on screens and displays
I2C Bus
i2c Inter-Integrated Circuit communication bus for connecting multiple devices
Template Number
template Create custom number entities with computed or user-adjustable values
Over-The-Air Updates (OTA)
ota Update ESPHome firmware wirelessly over the network
Home Assistant Sensor
homeassistant Import sensor values from Home Assistant entities
Script
script Create reusable automation sequences
SPI Bus
spi Serial Peripheral Interface communication bus for high-speed device connections
SNTP Time
sntp Synchronize time using Simple Network Time Protocol
Home Assistant Text Sensor
homeassistant Import text and string values from Home Assistant entities
WiFi
wifi Configure WiFi connectivity for ESP devices
Project Overview
ABANDONED 😢: I broke ☠️ the OLED. I’ll keep the document here for historical purposes, but I continued project with the round screen. The new version is here: Bedroom Controller
This advanced project creates a compact bedroom climate controller with a monochrome OLED display and capacitive touch interface that provides:
- 🕐 Real-time clock display with date
- 🌤️ Weather information (current temperature, forecast icon, and description)
- 🌡️ Indoor climate monitoring (temperature and humidity)
- 🔥 Thermostat control with multiple preset modes (frost, eco, comfort, boost)
- 🎯 Fine-grained temperature adjustment for boost mode
- 🚗 EV battery level monitoring
- 💡 Interactive LED feedback on touch buttons
- 📄 Multi-page interface with heating control page
- 🎨 Context-aware heating status visualization
This project is for a quick overview of important info on one page and then managing heating in the room. When you get up you can quickly see time/date, outside temperature, forecast and EV battery level (super important, right?).
On the other page are details of the temperature and humidity in the room and control of heating presets. One of the presets can also be modified to set a different temperature.
This is working, but it is still a work in progress. All functionality is working, next steps are to assemble it and get a nice enclosure for it.
Progress
- ✅ Main Configuration - fully functional
- 3D Enclosure
- Neopixel
- Further improvements
Future improvement ideas
- Neopixel for mood light and notifications
- Use LEDs on the touch screen for quick status
- Adding more pages?
- NOTE: I’m running close to the memory limit for additional features
Reusability Note
Substitutions are put at the top of the config file, so replacing them for your own sensor entity IDs and climate IDs will get it working for you. Some extra work needed if not all the same component used. Some of the components are obsolete so a different options might be required.
What You’ll Need
Hardware
- 1x DFRobot Beetle ESP32-C6 - Compact ESP32-C6 development board
- 1x SH1107 OLED Display (128x128, SPI) - Monochrome display breakout
- 1x Pimoroni Touch pHAT - 6 capacitive touch buttons with RGB LEDs (I2C)
- 1x Adafruit NeoPixel - RGB LED for ambient/notification
- Jumper wires for connections (for testing it)
- USB-C cable (data capable)
- Power supply (USB charger, 5V/1A minimum)
- This will require soldering if you want it properly assembled
- Optional: 3D printer for custom enclosure (design in progress)
Wiring Connections
The OLED display uses SPI bus, Touch breakout uses I2C and Neopixel uses GPIO.
| Component | ESP32-C6 GPIO | Notes |
|---|---|---|
| SPI Display (SH1107) | ||
| SCK | GPIO23 (SCK) | SPI Clock |
| MOSI | GPIO22 (MOSI) | SPI Master Out |
| CS | GPIO05 | Chip Select |
| DC | GPIO07 | Data/Command |
| I2C Touch pHAT (CAP1166) | ||
| 3 (GPIO 2) | GPIO19 (SDA) | I2C Data |
| 5 (GPIO 3) | GPIO20 (SCL) | I2C Clock |
| ESP32-C6 Built-in | ||
| LED | GPIO15 | Built-in LED - not used |
| BOOT | GPIO09 | Boot button - not used |
| NeoPixel (Future) | ||
| DIN | (TBD) | To be determined |
Power Notes:
- All components use 3.3V logic level
- Touch pHAT requires both 3.3V and 5V pins to be connected to power supply. It does not provide power supply
it requires power supply
- 3.3V power input is for power supply for the CAP1166 controller and logic
- 5V power input is for powering LEDs. It works with 3.3V and I connected it to 3.3V. Since this is for driving LEDs it will not affect overal functionality. LEDs might not be as bright. If you are using some other input device, make sure you check documentation for it. Connecting 5V supply to 3.3V device might ☠️ kill it.
Software
- ESPHome installed
- Home Assistant with configured weather integration
- Met.no used, which is used by 82.4% of all users so this should work out of the box.
- Home Assistant entities:
- Indoor temperature sensor
- Indoor humidity sensor
- Climate entity (thermostat/heater)
- EV Car integration and sensor for battery level
- USB-to-Serial drivers (ESP32-C6 implements USB 2.0 CDC so should work out of the box)
Required Home Assistant Entities
This project requires the following entities in Home Assistant. You’ll need to update the substitutions with your own entity IDs:
- Climate Entity: Thermostat/TRV with preset modes (frost, eco, comfort, boost)
- Example:
climate.bedroom_heater(using Versatile Thermostat integration) - Must support
preset_modeattribute andclimate.set_preset_modeaction
- Example:
- Temperature Sensor: Indoor temperature reading
- Example:
sensor.bedroom_temperature
- Example:
- Humidity Sensor: Indoor humidity reading
- Example:
sensor.bedroom_humidity
- Example:
- Weather Integration: Home Assistant weather entity
- Example:
weather.forecast_home - Must provide
temperatureandtemperature_unitattributes
- Example:
- EV Battery Sensor (optional): Electric vehicle battery level
- Example:
sensor.car_battery_level
- Example:
- Number Entity: Boost preset temperature setting (if using Versatile Thermostat)
- Example:
number.bedroom_heater_preset_boost_temp
- Example:
Additional Files
- Material Design Icons font file - see font component for more comprehensive explanation.
weather_icon_map.hheader file see Info Panel with ESP32 2.8” Display project for details.- CAP1166 custom component is pulled from github repository so no additional files for this are needed
Project Photos
Photos of the completed climate controller will be added here once the enclosure is designed.
Meanwhile have a look at some of the .
ESPHome Configuration
Prerequisites
Before using this configuration, ensure you have:
- Home Assistant with the following configured:
- Weather integration (provides
weather.forecast_homeentity) - Climate entity with preset mode support
- Indoor temperature and humidity sensors (Zigbee or other)
- A climate entity for heating control
- EV battery sensor integration
- Weather integration (provides
- Material Design Icons font file saved in your ESPHome directory as
assets/materialdesignicons-webfont.ttf - The
weather_icon_map.hheader file
Secrets File Setup
Create a secrets.yaml file in your ESPHome directory with your credentials:
wifi_ssid: "Your_WiFi_SSID"
wifi_password: "Your_WiFi_Password"
For more information on using secrets in ESPHome, refer to the ESPHome documentation.
Main Configuration File
If you’re using
ESPHome Device Builder
create your New Device. Or if you’re using
command line create your yaml file
(e.g. bedroom-controller.yaml)
Then use the following file as a guide (details on how to customize it are below):
esphome:
name: bedroom-controller
friendly_name: bedroom-controller
includes:
- weather_icon_map.h
on_boot:
- priority: 1
then:
- delay: 5s
- globals.set:
id: my_boot_in_progress
value: !lambda |-
return id(my_boot_in_progress) >= 2 ? 2 : id(my_boot_in_progress);
esp32:
variant: esp32c6
# Enable logging
logger:
#level: WARN
# Enable Home Assistant API
api:
encryption:
key: "<<generate your encription key>>"
ota:
- platform: esphome
password: "<<your ota pwd>>"
wifi:
ssid: !secret wifi_ssid
password: !secret wifi_password
# Enable fallback hotspot (captive portal) in case wifi connection fails
ap:
ssid: "Bedroom-Controller"
password: "<<your pwd>>"
on_connect:
- delay: 5s
- globals.set:
id: my_boot_in_progress
value: !lambda |-
return id(my_boot_in_progress) >= 1 ? 1 : 0;
captive_portal:
substitutions:
heater: bedroom_heater # Climate entity (without climate. prefix)
car_battery_level: ev_battery_level # EV battery sensor (without sensor. prefix)
indoor_temp: bedroom_temperature # Indoor temp sensor (without sensor. prefix)
indoor_humid: bedroom_humidity # Indoor humidity sensor (without sensor. prefix)
clk_pin: GPIO23
mosi_pin: GPIO22
sda_pin: GPIO19
scl_pin: GPIO20
disp_cs_pin: GPIO05
disp_dc_pin: GPIO07
external_components:
- source: github://barbarachbc/esphomecomponents
components: [ cap1166 ]
refresh: 5min
globals:
- id: my_boot_in_progress
type: int
restore_value: no
initial_value: '3'
- id: my_forecast_desc
type: std::string
restore_value: no
initial_value: '"Updating ..."'
- id: my_forecast_icon
type: std::string
restore_value: no
initial_value: '""'
- id: my_outside_temp
type: std::string
restore_value: no
initial_value: '"_.__C"'
- id: selecting_heating_preset
type: std::string
restore_value: no
initial_value: '""'
- id: changing_heating_temp
type: float
restore_value: no
initial_value: '0'
script:
- id: update_weather
then:
- globals.set:
id: my_boot_in_progress
#finally connected to Home Assistant
value: '0'
- globals.set:
id: my_forecast_icon
value: !lambda return weather_icon_map[id(forecast_desc).state.c_str()].c_str();
- globals.set:
id: my_forecast_desc
value: !lambda return weather_desc_map[id(forecast_desc).state.c_str()].c_str();
- id: update_outside_temp
then:
- globals.set:
id: my_outside_temp
value: !lambda return str_sprintf("%.1f%s", id(outside_temperature).state, id(outside_temperature_unit).state.c_str());
- id: a_button_click
then:
- if:
condition:
- lambda: return id(changing_heating_temp) > 0;
then:
- globals.set:
id: changing_heating_temp
value: !lambda |-
if(id(changing_heating_temp) <= 15){
return 15.0;
} else {
return id(changing_heating_temp) - 0.5;
}
else:
- script.execute:
id: change_preset
preset: "frost"
- id: d_button_click
then:
- if:
condition:
- lambda: return id(changing_heating_temp) > 0;
then:
- globals.set:
id: changing_heating_temp
value: !lambda |-
if(id(changing_heating_temp) >= 28){
return 28.0;
} else {
return id(changing_heating_temp) + 0.5;
}
else:
- script.execute:
id: change_preset
preset: "boost"
- id: change_preset
parameters:
preset: string
then:
- if:
condition:
and:
- display.is_displaying_page: page_heating
- lambda: return id(selecting_heating_preset) == "" && id(changing_heating_temp) <= 0;
- not:
text_sensor.state:
id: indoor_temp_preset
state: !lambda return preset;
then:
- globals.set:
id: selecting_heating_preset
value: !lambda return preset;
- component.update: my_display
- light.turn_on: my_light_forward
- light.turn_on: my_light_back
- id: accept_button_click
then:
- if:
condition:
- lambda: return id(selecting_heating_preset) == "" && id(changing_heating_temp) <= 0;
then:
- display.page.show_next: my_display
- component.update: my_display
- if:
condition:
- lambda: return id(selecting_heating_preset) != "";
then:
- script.execute:
id: set_indoor_preset
preset: !lambda return id(selecting_heating_preset);
- globals.set:
id: selecting_heating_preset
value: '""'
- component.update: my_display
- light.turn_off: my_light_forward
- light.turn_off: my_light_back
- if:
condition:
- lambda: return id(changing_heating_temp) > 0;
then:
- script.execute:
id: change_preset_amount
preset: "boost"
set_to: !lambda return id(changing_heating_temp);
- globals.set:
id: changing_heating_temp
value: '0'
- component.update: my_display
- light.turn_off: my_light_forward
- light.turn_off: my_light_back
- light.turn_off: my_light_a
- light.turn_off: my_light_d
- id: cancel_button_click
then:
- if:
condition:
- lambda: return id(selecting_heating_preset) == "" && id(changing_heating_temp) <= 0;
then:
- display.page.show_previous: my_display
- component.update: my_display
- if:
condition:
- lambda: return id(selecting_heating_preset) != "";
then:
- globals.set:
id: selecting_heating_preset
value: '""'
- component.update: my_display
- light.turn_off: my_light_forward
- light.turn_off: my_light_back
- if:
condition:
- lambda: return id(changing_heating_temp) > 0;
then:
- globals.set:
id: changing_heating_temp
value: '0'
- component.update: my_display
- light.turn_off: my_light_forward
- light.turn_off: my_light_back
- light.turn_off: my_light_a
- light.turn_off: my_light_d
- id: set_indoor_preset
parameters:
preset: string
then:
- homeassistant.action:
action: climate.set_preset_mode
data:
entity_id: climate.${heater}
data_template:
preset_mode: !lambda return preset;
- id: change_preset_amount
parameters:
preset: string
set_to: float
then:
- if:
condition:
- lambda: return preset == "boost";
then:
- number.set:
id: indoor_temp_preset_boost
value: !lambda return set_to;
- id: touch_d_long_click
then:
- if:
condition:
- lambda: return id(selecting_heating_preset) == "" && id(changing_heating_temp) <= 0;
then:
- globals.set:
id: changing_heating_temp
#round to 0.5
value: !lambda return round(id(indoor_temp_preset_boost).state * 2.0)/2.0;
- light.turn_on: my_light_forward
- light.turn_on: my_light_back
- light.turn_on: my_light_a
- light.turn_on: my_light_d
text_sensor:
- platform: homeassistant
id: outside_temperature_unit
entity_id: weather.forecast_home
attribute: temperature_unit
internal: true
on_value:
then:
- script.execute: update_outside_temp
- platform: homeassistant
id: forecast_desc
entity_id: weather.forecast_home
internal: true
on_value:
then:
script.execute: update_weather
- platform: homeassistant
id: indoor_hvac_action
attribute: hvac_action
entity_id: climate.${heater}
internal: true
- platform: homeassistant
id: indoor_temp_preset
attribute: preset_mode
entity_id: climate.${heater}
internal: true
number:
- platform: template
name: Screen timeout
optimistic: true
id: display_timeout
unit_of_measurement: "s"
initial_value: 45
restore_value: true
min_value: 10
max_value: 180
step: 5
mode: box
- platform: template
name: LED Brightness
optimistic: true
id: led_brightness
unit_of_measurement: "%"
initial_value: 40
restore_value: true
min_value: 0
max_value: 100
step: 5
icon: mdi:brightness-percent
on_value:
then:
- lambda: |-
id(touch_phat).update_all_brightness(0, id(led_brightness).state);
- platform: homeassistant
id: battery_level
entity_id: sensor.${car_battery_level}
internal: true
- platform: homeassistant
id: indoor_temp_preset_boost
entity_id: number.${heater}_preset_boost_temp
internal: true
sensor:
- platform: homeassistant
id: outside_temperature
attribute: temperature
entity_id: weather.forecast_home
internal: true
on_value:
then:
script.execute: update_outside_temp
- platform: homeassistant
id: indoor_temperature
entity_id: sensor.${indoor_temp}
internal: true
- platform: homeassistant
id: indoor_humidity
entity_id: sensor.${indoor_humid}
internal: true
- platform: homeassistant
id: indoor_temp_setting
attribute: temperature
entity_id: climate.${heater}
internal: true
time:
- platform: sntp
id: my_time
timezone: Europe/Dublin
spi:
clk_pin: ${clk_pin}
mosi_pin: ${mosi_pin}
i2c:
id: i2c_bus
sda: ${sda_pin}
scl: ${scl_pin}
cap1166:
- id: touch_phat
address: 0x2C
touch_threshold: 0x40
allow_multiple_touches: false
brightness_configs:
- led_behavior: DIRECT
max_brightness: 40%
- led_behavior: PULSE1
max_brightness: 40%
- led_behavior: PULSE2
max_brightness: 40%
- led_behavior: BREATHE
max_brightness: 40%
binary_sensor:
- platform: cap1166
id: touch_back
channel: 0
on_click:
min_length: 50ms
max_length: 350ms
then:
- script.execute:
id: cancel_button_click
- platform: cap1166
id: touch_A
channel: 1
on_click:
- min_length: 50ms
max_length: 350ms
then:
- script.execute:
id: a_button_click
- platform: cap1166
id: touch_B
channel: 2
on_click:
min_length: 50ms
max_length: 350ms
then:
- script.execute:
id: change_preset
preset: "eco"
- platform: cap1166
id: touch_C
channel: 3
on_click:
min_length: 50ms
max_length: 350ms
then:
- script.execute:
id: change_preset
preset: "comfort"
- platform: cap1166
id: touch_D
channel: 4
on_click:
- min_length: 50ms
max_length: 350ms
then:
- script.execute:
id: d_button_click
- min_length: 350ms
max_length: 2000ms
then:
- script.execute:
id: touch_d_long_click
- platform: cap1166
id: touch_forward
channel: 5
on_click:
min_length: 50ms
max_length: 350ms
then:
- script.execute:
id: accept_button_click
light:
#NOTE: touch phat has them connected inversly
- id: my_light_forward
platform: cap1166
internal: true
channel: 0
led_behavior: PULSE2
- id: my_light_d
platform: cap1166
name: "Light D"
channel: 1
led_behavior: DIRECT
- id: my_light_c
name: "Light C"
platform: cap1166
channel: 2
led_behavior: DIRECT
- id: my_light_b
platform: cap1166
name: "Light B"
channel: 3
led_behavior: DIRECT
- id: my_light_a
platform: cap1166
name: "Light A"
channel: 4
led_behavior: DIRECT
- id: my_light_back
platform: cap1166
internal: true
channel: 5
led_behavior: PULSE2
font:
#mono screen, so no anti aliasing
- id: value_med
file:
type: gfonts
family: Montserrat
size: 14
bpp: 1
- id: value_small
file:
type: gfonts
family: Montserrat
size: 10
bpp: 1
- id: value_large
file:
type: gfonts
family: Montserrat
weight: bold
size: 20
bpp: 1
- id: mdi_small
file: assets/materialdesignicons-webfont.ttf
size: 24
bpp: 1
glyphs: [
"\U000F1A71", # snowflake-thermometer
"\U000F032A", # leaf
"\U000F04B9", # sofa
"\U000F14DE", # rocket-launch
"\U000F0C52", # checkbox-outline
"\U000F0158", # close-box-outline
"\U000F0704", # plus-box-outline
"\U000F06F2", # minus-box-outline
]
- id: mdi_med
file: assets/materialdesignicons-webfont.ttf
size: 32
bpp: 1
glyphs: [
"\U000F1807", # mdi-fire-circle
"\U000F0E1B", # mdi-car-back
]
- id: mdi_large
file: assets/materialdesignicons-webfont.ttf
size: 48
bpp: 1
glyphs: [
"\U000F0594", # clear-night
"\U000F0590", # cloudy
"\U000F0F2F", # exceptional
"\U000F0591", # fog
"\U000F0592", # hail
"\U000F0593", # lightning
"\U000F067E", # lightning-rainy
"\U000F0595", # partlycloudy
"\U000F0596", # pouring
"\U000F0597", # rainy
"\U000F0598", # snowy
"\U000F067F", # snowy-rainy
"\U000F0599", # sunny
"\U000F059D", # windy
"\U000F059E", # windy-variant
"\U000F14E4", # sunny-off
"\U000F1A71", # snowflake-thermometer
"\U000F032A", # leaf
"\U000F04B9", # sofa
"\U000F14DE", # rocket-launch
]
image:
- id: boot_logo
type: BINARY
file: mdi:home-automation
resize: 80x80
display:
- platform: ssd1306_spi
id: my_display
model: "SH1107 128x128"
cs_pin: ${disp_cs_pin}
dc_pin: ${disp_dc_pin}
rotation: 180
update_interval: 1s
pages:
- id: page_info
lambda: |-
if (id(my_boot_in_progress) > 0) {
if(id(my_boot_in_progress)>1)
{
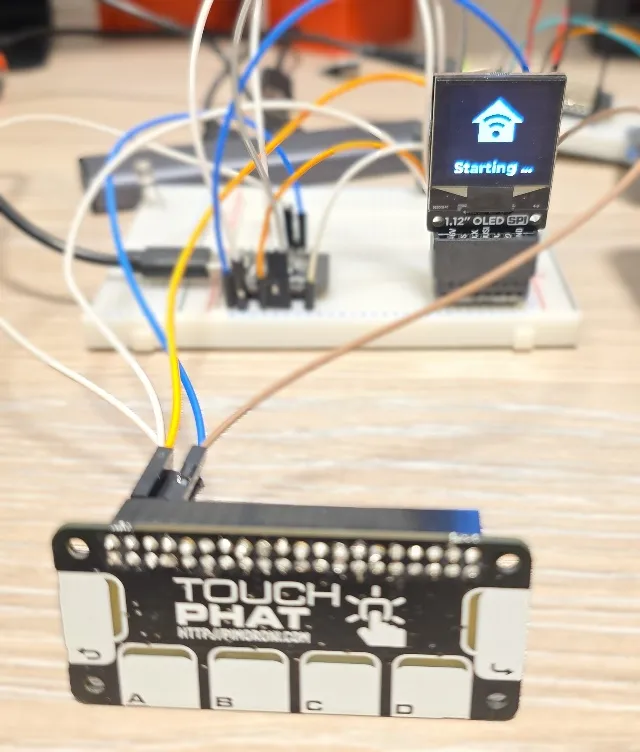
it.printf(it.get_width()/2, 114, id(value_large), COLOR_ON, TextAlign::CENTER, "Starting ...");
}else {
it.printf(it.get_width()/2, 114, id(value_large), COLOR_ON, TextAlign::CENTER, "Connecting");
}
it.image(it.get_width()/2, 50, id(boot_logo), ImageAlign::CENTER);
return;
}
//print time and date
if (id(my_time).now().is_valid()) {
it.strftime(it.get_width()/2, 14, id(value_large), COLOR_ON, TextAlign::CENTER, "%I:%M %p", id(my_time).now());
it.strftime(it.get_width()/2, 114, id(value_med), COLOR_ON, TextAlign::CENTER, "%a, %e %b", id(my_time).now());
}
it.printf(4, 27, id(mdi_large), COLOR_ON, id(my_forecast_icon).c_str());
it.printf(90, 27, id(value_small), COLOR_ON, TextAlign::TOP_CENTER, id(my_forecast_desc).c_str());
it.printf(4, 76, id(value_large), COLOR_ON, id(my_outside_temp).c_str());
it.printf(96, 42, id(mdi_med), COLOR_ON, TextAlign::TOP_CENTER, "\U000F0E1B");
it.printf(96, 76, id(value_med), COLOR_ON, TextAlign::TOP_CENTER, "%.0f%%", id(battery_level).state);
- id: page_heating
lambda: |-
if (id(my_boot_in_progress) > 0) {
it.printf(it.get_width()/2, 114, id(value_large), COLOR_ON, TextAlign::CENTER, "Connecting");
it.image(it.get_width()/2, 50, id(boot_logo), ImageAlign::CENTER);
return;
}
const std::string presets[] = {
"frost", "eco", "comfort", "boost"
};
const std::string icons[] = {
"\U000F1A71", "\U000F032A", "\U000F04B9", "\U000F14DE"
};
if(id(selecting_heating_preset) == "" && id(changing_heating_temp) <= 0){
//print time and date
if (id(my_time).now().is_valid()) {
it.strftime(it.get_width() - 2, 2, id(value_med), COLOR_ON, TextAlign::TOP_RIGHT, "%I:%M %p", id(my_time).now());
}
auto heating_is_on = id(indoor_hvac_action).state == "heating";
auto current_temp_preset = id(indoor_temp_preset).state;
if(heating_is_on){
it.printf(4, 12, id(mdi_med), COLOR_ON, "\U000F1807");
}
it.printf(4, 52, id(value_large), COLOR_ON, "%.1f%s", id(indoor_temperature).state, id(outside_temperature_unit).state.c_str());
it.printf(4, 76, id(value_med), COLOR_ON, "%.0f%%", id(indoor_humidity).state);
it.printf(it.get_width() - 4, 52, id(value_med), COLOR_ON, TextAlign::TOP_RIGHT, "%.1f%s",
id(indoor_temp_setting).state, id(outside_temperature_unit).state.c_str());
it.printf(it.get_width() - 4, 76, id(value_med), COLOR_ON, TextAlign::TOP_RIGHT, current_temp_preset.c_str());
//show icons
const int icon_size = 24;
auto y = it.get_height() - icon_size;
for(auto i = 0; i<4; i++){
auto is_selected = current_temp_preset == presets[i];
auto x = 2 + icon_size*i + 9*i; auto invert_icon = false;
if(is_selected){
if(heating_is_on){
invert_icon = true;
it.filled_rectangle(x, y-1, icon_size+1, icon_size+1);
}else{
it.rectangle(x, y-1, icon_size+1, icon_size+1);
}
}
it.printf(x, y, id(mdi_small), invert_icon ? COLOR_OFF : COLOR_ON, icons[i].c_str());
}
} else if(id(selecting_heating_preset) != ""){
bool is_selected = false;
for(auto i = 0; i<4; i++){
if(id(selecting_heating_preset) != presets[i]){
continue;
}
is_selected = true;
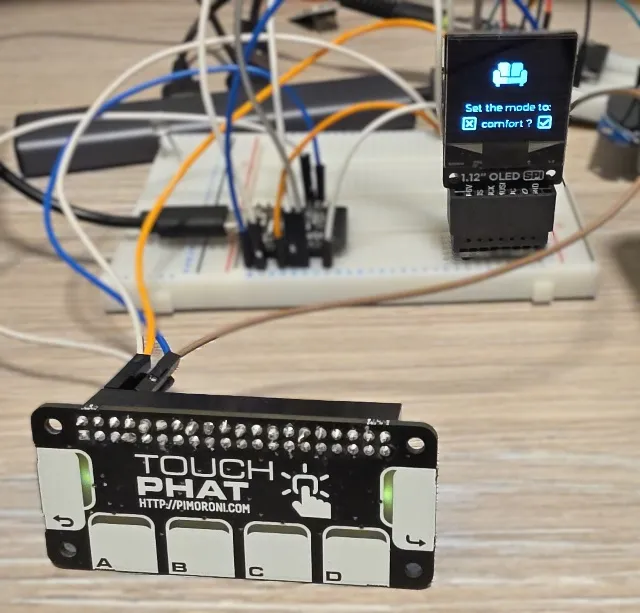
it.printf(it.get_width()/2, it.get_height()/2, id(mdi_large), COLOR_ON, TextAlign::BOTTOM_CENTER, icons[i].c_str());
it.printf(it.get_width()/2, it.get_height()-48, id(value_med), COLOR_ON, TextAlign::TOP_CENTER,
"Set the mode to:");
it.printf(it.get_width()/2, it.get_height()-24, id(value_med), COLOR_ON, TextAlign::TOP_CENTER,
"%s ?", id(selecting_heating_preset).c_str());
break;
}
if(is_selected){
//apply
it.printf(0, it.get_height() - 28, id(mdi_small), COLOR_ON, TextAlign::TOP_LEFT, "\U000F0158");
//cancel
it.printf(it.get_width(), it.get_height() - 28, id(mdi_small), COLOR_ON, TextAlign::TOP_RIGHT, "\U000F0C52");
}
if(!is_selected){
id(selecting_heating_preset) = "";
}
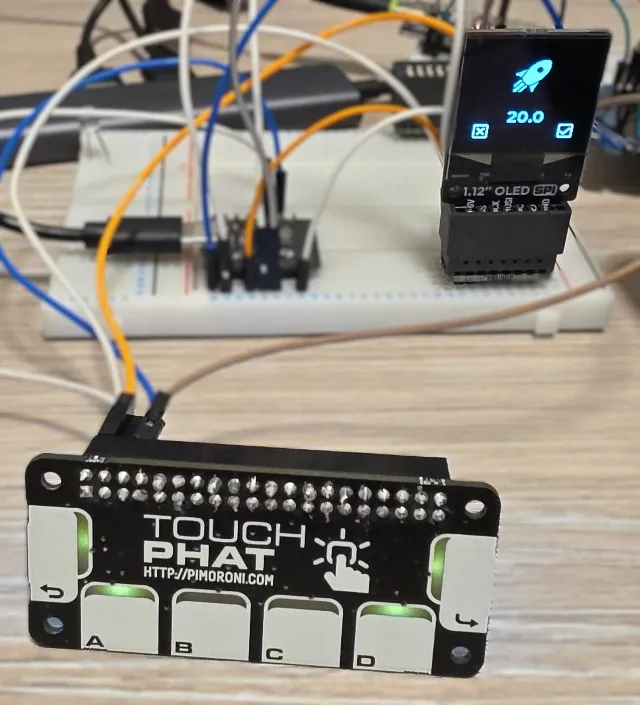
} else if(id(changing_heating_temp) > 0){
it.printf(it.get_width()/2, it.get_height()/2, id(mdi_large), COLOR_ON, TextAlign::BOTTOM_CENTER, "\U000F14DE");
it.printf(it.get_width()/2, it.get_height()-48, id(value_large), COLOR_ON, TextAlign::TOP_CENTER, "%.1f", id(changing_heating_temp));
//apply
it.printf(0, it.get_height() - 48, id(mdi_small), COLOR_ON, TextAlign::TOP_LEFT, "\U000F0158");
//cancel
it.printf(it.get_width(), it.get_height() - 48, id(mdi_small), COLOR_ON, TextAlign::TOP_RIGHT, "\U000F0C52");
//minus
it.printf(24, it.get_height() - 28, id(mdi_small), COLOR_ON, TextAlign::TOP_LEFT, "\U000F06F2");
//plus
it.printf(it.get_width() - 24, it.get_height() - 28, id(mdi_small), COLOR_ON, TextAlign::TOP_RIGHT, "\U000F0704");
}
Configuration Breakdown
Substitutions
The configuration uses substitutions to make it easy to adapt to your Home Assistant setup. Update these with your own entity IDs:
substitutions:
  heater: bedroom_heater                # Climate entity (without climate. prefix)
  car_battery_level: ev_battery_level   # EV battery sensor (without sensor. prefix)
  indoor_temp: bedroom_temperature      # Indoor temp sensor (without sensor. prefix)
  indoor_humid: bedroom_humidity        # Indoor humidity sensor (without sensor. prefix)
Boot Progress Tracking
The my_boot_in_progress global variable tracks the device startup stages:
- 3: ESP32 starting up
- 2: Boot Finished
- 1: Wifi Connected
- 0: Connected to Home Assistant (Fully connected and ready)
This is controlling boot display. If you look at the code I wasn’t 100% sure of the ordering of events or whether there might be some racing conditions. The boot screen is shown all the way until device connects to Home Assistant.
Climate Control Integration
This configuration is designed to work with the Versatile Thermostat integration custom integration for Home Assistant. Versatile Thermostat provides:
- Multiple preset modes (frost, eco, comfort, boost)
- Individual temperature settings per preset
- Advanced heating strategies
- Comprehensive automation support
Important: If you’re using a different climate integration, you may need to adjust:
- Preset mode names in scripts
- The
indoor_temp_preset_boostnumber entity reference - Preset mode icons
Touch Button Functions
Information Page (page_info)
- FORWARD: Navigates to the heating page
- BACK: Navigates to the heating page (same as forward, only 2 pages)
Heating Page (page_heating)
Normal Mode:
- FORWARD: Navigate to info page
- BACK: Navigate to info page (same as forward, only 2 pages)
- Button A: Select “frost” preset
- Button B: Select “eco” preset
- Button C: Select “comfort” preset
- Button D (short press): Select “boost” preset
- Button D (long press): Enter temperature adjustment mode for boost
Preset Confirmation Mode:
- FORWARD: Confirm preset change
- BACK: Cancel preset change
- Buttons A-D: No function
Temperature Adjustment Mode:
- FORWARD: Confirm new temperature
- BACK: Cancel temperature change
- Button A: Decrease by 0.5°C (min 15°C)
- Button D: Increase by 0.5°C (max 28°C)
- Buttons B, C: No function
LED Feedback
The Touch pHAT LEDs provide visual feedback:
- Normal mode: LEDs off
- Preset confirmation: Forward and Back LEDs pulsing
- Temperature adjustment: Forward, Back, A, and D LEDs lit
LED brightness can be adjusted via the “LED Brightness” number entity (0-100%).
Display Pages
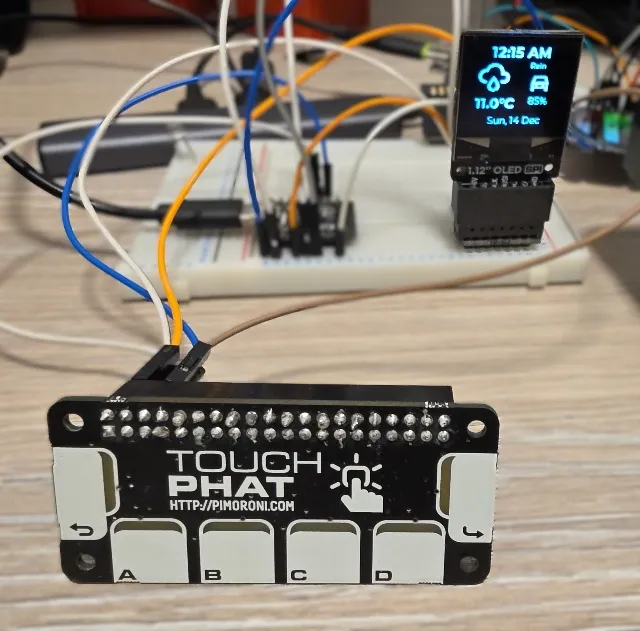
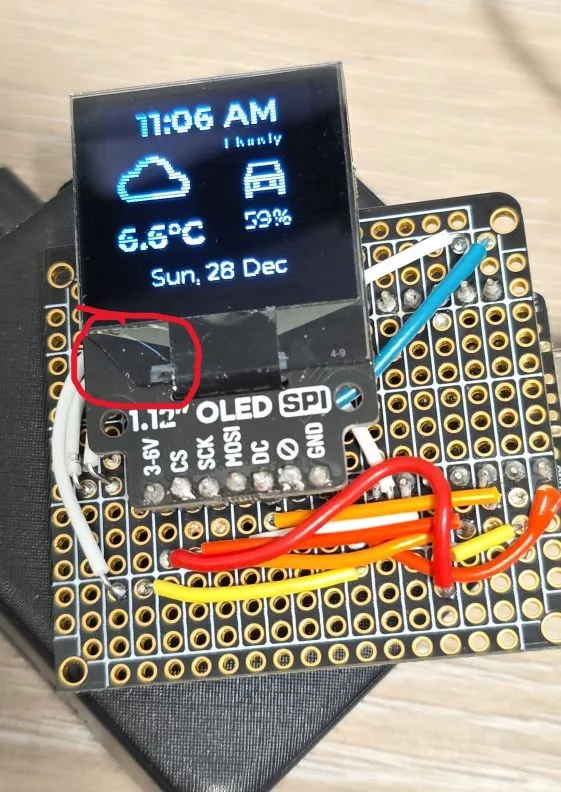
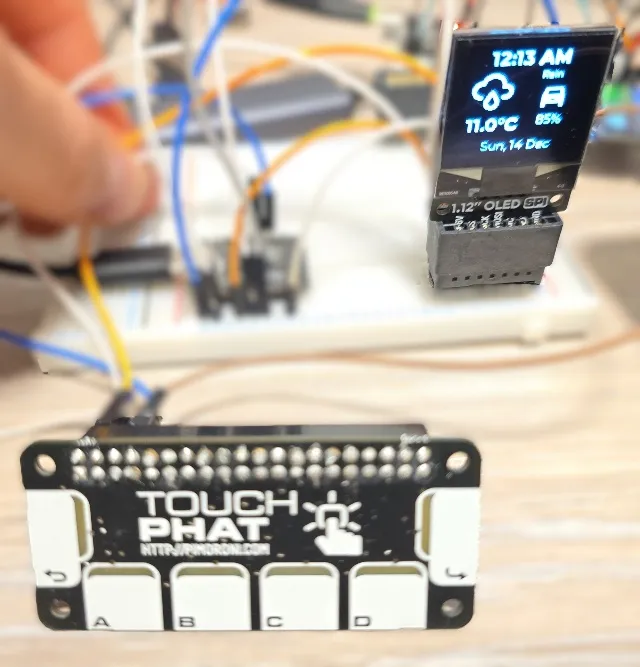
Page 1: Information Display
- Current time (12-hour format with AM/PM)
- Current date (day, date, month)
- Weather icon and description
- Outside temperature
- EV battery level with car icon
Page 2: Heating Control
- Current time (top-right)
- Heating active indicator (top-left, only when heating)
- Indoor temperature (large, left side)
- Indoor humidity (below temperature)
- Target temperature setting (right side)
- Current preset mode name (below target)
- Preset mode icons at bottom (highlighted when active)
Weather Integration
This project assumes you have a working weather integration in Home Assistant, typically configured as
weather.forecast_home. The configuration retrieves:
- Current temperature (from
temperatureattribute) - Temperature unit (C or F)
- Weather condition (for icon mapping)
Installation Steps
Prepare Hardware
- Wire all components according to the wiring table above
- Double-check all connections before powering on
- NOTE: Touch pHAT - I connected both 5V and 3.3V pins to the 3.3V power suppy pin on the board
- Ensure all I2C and SPI connections are correct
Prepare Files
- Download the Material Design Icons - details in font component.
- Create the
weather_icon_map.hheader file (content here) - Create your
secrets.yamlfile with your WiFi credentials
NOTE: no need to do anything for the external component, the CAP1166 component code downloaded from github automatically.
Update Configuration
- Modify the
substitutionssection with your Home Assistant entity IDs - Update the API encryption key (generate a new one for security)
- Set secure OTA and fallback hotspot passwords
- Adjust timezone in
timecomponent if not in Europe/Dublin
More info on how to manage secrets.
Flash ESPHome
Use ESPHome Device Builder, that’s simplest. After the first flash, you can use OTA updates.
Add to Home Assistant
The device should be automatically discovered in Home Assistant:
- Go to Settings → Devices & Services
- Look for the discovered ESPHome device
- Click Configure and enter your API encryption key
- ⚠️ By default new ESPHome device is not allowed to perform any Home Assistant Actions
- In order to:
- change heating presets
- change “boost” preset configuration
- You need to go to device settings in Home Assistant and select:
- Allow the device to perform Home Assistant actions
- In order to:
Verify Operation
Check that:
- Display shows boot screen then connects
- Time and weather information appear on info page
- Indoor temperature and humidity display on heating page
- Page navigation works (forward/back buttons)
- Preset icons show current heating mode
Troubleshooting
Stuck at Boot Screen
If you’re stuck at boot screen that usually means the device cannot connect to WiFi.
Check your secrets.yaml that you have correct WiFi ssid and password. If this is correct, the best is to connect the device to your computer, open up ESPHome Web, connect to the device and open up logs. Reboot the device to see the logs from starting up and hopefully that will reveal any issues.
If no issues show up change logging level:
logger:
  level: DEBUG
Note that the boot screen will be on until connection is established with Home Assistant, so the issue might be that the device cannot connect to WiFi or it can connect to WiFi but not to Home Assistant afterwards.
Entity Status Not Updated
Check substitutions making sure that you have entered correct entity ids. For temperature/humidity sensor this should work just fine and a typo or incorrect entity id is most likely issue. Any climate entity should work for controling heating but see below.
Heating Control Not Working
If the correct preset and temperature setting is not updated - verify that climate entity ID is correct.
If the heater button doesn’t control thermostat - did you: Allow the device to perform Home Assistant actions?
While this should work with any climate control, check that preset modes (frost, boost, eco)
are supported. If they are not, you might need to change config slightly to support your
settings. Maybe your setting doesn’t have a boost preset - just replace boost in the
configuration with what your desired setting is. The same goes for frost, eco and comfort.
Random Reboots or Crashes
Problem: Device restarts unexpectedly
Solutions:
- Use adequate power supply (1A minimum)
- Reduce display buffer size if running out of memory
- Lower logger level to WARN or ERROR
- Disable unnecessary components temporarily
Display Not Working
Problem: Screen stays blank or shows no output
Solutions:
- Verify SPI wiring (CLK, MOSI, CS, DC pins)
- Check display model is “SH1107 128x128” … or if you’re modifying this - whatever your model is
- Verify CS and DC pin assignments match your wiring
- Try different
rotationvalues (0, 90, 180, 270) - Check display power supply (3.3V)
- Test with simpler display code first - go to the list of devices and filter by
displaycategory. If your display is in the list it will have information how to set it up and will have simple display configuration.
Touch Buttons Not Responding
Problem: Touch pHAT doesn’t register touches
Solutions:
- Verify I2C wiring (SDA: GPIO19, SCL: GPIO20)
- Check Touch pHAT has 5V power
- Verify I2C address is 0x2C (check with I2C scanner)
- Adjust
touch_thresholdvalue (generally: 0x01 is most sensitive, 0x80 is least sensitive. My configuration is 0x40 - Medium. Try 0x20 first and see how it goes) - Look for I2C errors in ESPHome logs
LEDs Not Lighting
Problem: Touch pHAT LEDs don’t respond
Solutions:
- Verify I2C communication is working (touch should work first)
- Check LED brightness setting (increase to 100% for testing)
- Test individual lights from Home Assistant
Temperature Adjustment Not Working
Problem: Long-press on Button D doesn’t enter adjustment mode
Solutions:
- Verify you’re on the heating page (page 2)
- Are you pressing it not too short and not too long? Press should be between 350ms and 2000ms long 👀
- Check
number.${heater}_preset_boost_tempnumber entity exists. You might not have this in Home Assistant if you’re not using Versatile Thermostat - you might need to replace this with what you want to change. - Ensure you’re not already in selection mode
- Increase long-press duration threshold if needed
- Check lambda logic in
touch_d_long_clickscript
Future Enhancements
This project documentation will be updated with:
- NeoPixel Integration - Add RGB LED for ambient lighting and notifications
- 3D Enclosure Design - STL files and assembly instructions
Other Images
Work in Progress
- Starting up
- Info
- Heating

- Set Heating Preset
- Set Boost Temperature